Wake-on-LAN using Cloud Functions
This is a small guide on how you can wake up your computer from anywhere in the world. It's a reliable setup I've used for several years to access my data remotely, without the need of keeping a device powered at all times.
The only hard requirement for this guide is that your home network is reachable via a public IP (it can be either static or dynamic). While it is still possible to do this if you're behind a NAT, it involves some wizardry that is (currently) beyond the scope of the article.
Wake-on-LAN (WOL) is a hardware technology that allows a device to wake up by receiving a "magic" packet over the network. Waking up in this context means the device transitions from a low power state (when only the network card is active, listening for the special network packets) to full power.
One particular issue with Wake-on-LAN is sitting right in its name name: the LAN part. It was designed to be used within the local network, meaning that if you are out in the Internet, it will not work. We need a device that is both accessible from the Internet and has access to the local network. This device is none other than your home router. Thankfully most home routers (even the basic ones) support Wake-on-LAN, so we can leverage that. All we need to do is to send the magic packet to our router and instruct it to forward the packet to our device.
Basic Setup
BIOS settings
Let's begin by enabling Wake-on-LAN in BIOS/UEFI. This vastly depends on your hardware and BIOS implementations, but the setting is not so hard to find.
Here are some common locations to look for:
Power Management -> Wake on LAN
Advanced -> APM Configuration -> Power On By PCI-E
Settings -> Advanced -> Wake Up Event Setup
Advanced -> ACPI Configuration -> PCI Devices Power On
If you can't find the setting, it's probably better to give your AI assistant your motherboard model and it will tell you where to find it.
OS Settings
Next, you want to enable the setting in your operating system. Again, these settings vary vastly from system to system, so don't be afraid to ask your AI buddy.
For Windows, it's important to install the latest motherboard/network card drivers from the manufacturer. The generic drivers that come with Windows may not allow Wake-on-LAN.
Here's how to enable the setting in Windows 11
 Win+X -> Device Manager -> Network Adapters -> double click on your network adapter -> Power Management -> Allow this device to wake the computer : Enabled -> Only allow a magic packet to wake the computer : Enabled

 Win+X -> Device Manager -> Network Adapters -> double click on your network adapter -> Advanced -> Wake Magic Packet: Enabled -> Wake on Pattern Match: Enabled
Note that the settings in the the Advanced tab might differ slightly depending on the driver.
For Linux (Ubuntu) you might want to use ethtool
sudo ethtool -s <NIC> wol g
For macOS, you might want to go to:
System Preferences -> Energy Saver -> Wake for network access
Testing the LAN setup
At this point we can test our config by sending a "magic packet" to our network card, which will wake up the PC.
Currently we can only do this from our local network.
We can use a dedicated app like Wolow from your phone to test the config.
You will need to supply it a mac address. This is the hardware address of your network card. We can obtain it in the command line:
For Windows run ipconfig /all . Look for the physical address corresponding to the ethernet connection:
 Connection-specific DNS Suffix  . : lan
 Description . . . . . . . . . . . : Intel(R) I211 Gigabit Network Connection
 Physical Address. . . . . . . . . : A8-5E-45-12-39-8F
For linux and macOS, run ifconfig in the terminal and look for something like:
link/ether 00:1a:3b:5c:2d:3e
Reliability
Wake-on-LAN has an Achilles heel: a power failure may cause it to stop functioning. Even if the power comes back on, you might need a full system boot to re-initialize the network card (NIC) and re-activate Wake-on-LAN.
However, modern PCs can mitigate this. First, make sure your PSU delivers 5V standby (5VSB). Most modern PSUs do.
Secondly, a lot of modern motherboards reinitialize the network after power is restored, allowing it to respond to WoL packets. Unfortunately I've not found a reliable way to tell which motherboards support this feature.
It's still a topic to be researched.
It's a good idea to also put this to the test. Simply unplug your PC (while turned off) and plug it back on. Then, try waking it up. If it doesn't work, it means your system needs a full reboot after the power failure.
Router Settings
So far, we've made our setup work in the local network. To allow Wake-on-LAN to work over the Internet, we must ensure that our router is visible over the internet.
There are generally 3 ways in which you can get your IP address from your ISP:
- public static IP - highly unlikely
- public dynamic IP (using something like PPPoE)
- private IP - you are behind a NAT
The remaining part of this guide will work only if you have public IP. If you are behind a NAT, it's still possible to use Wake-on-LAN, but with a more complicated setup, which is out of scope for now.
Dynamic DNS
Let's focus on the scenario where you have a public dynamic IP.
This IP will change from time to time, so you need to use something called dynamic DNS to associate this shifting address to a domain name.
It is best to check with your ISP first, they might already provide Dynamic DNS for free. If not, you can use noip or a similar service.
Once you get some Dynamic DNS credentials, you need to enter them in the router settings. Again, this depends on your router model, so use your AI buddy if you can't find the setting.
Some router manufacturers also offer Dynamic DNS as a "Cloud" service. For example if using a Mikrotik router, enabling Dynamic DNS is just a matter of ticking a checkbox:

Port Forwarding
Another thing we need to configure on the router is port forwarding. Wake-on-LAN uses UDP port 9. This needs to be forwarded to your PC, but with one caveat. When setting up port forwarding, don't use the IP address of you PC, instead use the broadcast address.
Lets say your PC has an IP address of 192.168.0.10. You need to setup port forwarding to 192.168.0.255, for UDP port 9.
Testing the remote setup
At this point we are done setting up the router. We can test this setup by using a web-based Wake-on-LAN service like Depicus.
Of course, we need to provide it with a mac address, just as we did when testing the LAN setup.
Depicus will give you a unique URL which you can bookmark and access it whenever you need to wake up your PC. It should look something like this:
https://www.depicus.com/wake-on-lan/woli?m=001143BDA600&i=212.159.110.168&s=255.255.255.255&p=4343
Cloud Functions
At this point we can wake up our PC from anywhere in the world, but there are some issues:
- we needed to share our domain name on a public service
- there is no control over the web service that wakes up the PC. For example, the browser may cache the URL we got from Depicus and access it randomly. Mobile Safari does this for some obscure reason. I've had my PC wake up several times during the night without my actual input.
Hosting our own Wake-on-LAN service in the cloud would solve these issues. Using cloud functions (also known as serverless functions / lambdas / workers etc.) is the easiest way, since we don't need a dedicated web server. Also, it's completely free for our use case.
In this example, I'm using Google Cloud Functions, but you can easily adapt the code to other cloud providers.
Finally, let's dive into some code:
// Wake on LAN Cloud Function

/////////////////////
// Configuration area

const host = { name: 'myPC', mac: '00:1F:C6:9C:25:7C', address: 'mihai.noip.org' };
const WAKEPASSWORD = 'password';
const runLocally = false;

//////////////////
// Cloud Function

const wol = require('wake_on_lan');
const querystring = require('querystring');
var token = null;

exports['wake_' + host.name] = (req, res) => {

  if (req.method == "GET") {
    res.setHeader('Content-Type', 'text/html');
    res.writeHead(200);
    token = Math.random().toString(16).slice(2);
    setTimeout(() => { token = null }, 1000 * 60 * 2);

    res.end(
      `<html><head>\
          <meta name="viewport" content="width=device-width, initial-scale=1">\
          <style>input {height: 40px; font-size: 15px; }</style>\
        </head><body>\
          <form action="/wake_${host.name}" method="post">\
            <input type="hidden" name="token" value=${token}>\
                    <input type="password" name="pwd">\
                    <input type="submit" value="wake up my friend">\
            </form></body></html>`);
  }
  else if (req.method == 'POST') {
    var contentType = 'application/x-www-form-urlencoded';

    if (req.get('content-type') == contentType) {
      if (!token || req.body.token != token) {
        res.status(200).send('<h2>Invalid token</h2>')
        return;
      }

      if (req.body.pwd === WAKEPASSWORD) {

        wol.wake(host.mac, { address: host.address, port: 9 });
        wol.wake(host.mac, { address: host.address, port: 8 });

        res.status(200).send('<h2>Magic package sent</h2>');
      }
      else {
        res.status(200).send('<h2>Invalid password</h2>');
      }
    }
    else {
      res.status(200).send('<h2>Invalid request</h2>');
    }
  }
  else {
    res.status(405).end();
  };
};

/////////////////////
// Run locally setup

if (runLocally) {
  var express = require('express');
  var bodyParser = require('body-parser');
  var app = express();
  app.use(bodyParser.urlencoded({ extended: false }))
  app.use(bodyParser.json())
  app.all("/wake_" + host.name, exports['wake_' + host.name])
  require("http").createServer(app).listen(80);
}
We essentially have a simple node.js server that can respond to a GET and a POST request.
On the GET request, we return a simple form with a password field. We need a password because we don't want any random dude waking up our PC, but also to prevent browser caching.
Since browsers also cache POST request, we generate a random token on the GET request, which needs to be present in the POST request.
if (req.method == "GET") {
  token = Math.random().toString(16).slice(2);
  setTimeout(() => { token = null }, 1000 * 60 * 2);
}
...
else if (req.method == 'POST') {
  if (!token || req.body.token != token) {
    res.status(200).send('<h2>Invalid token</h2>')
    return;
  }
...
On the POST request, we send our magic packet using the wake_on_lan module.
To test this before deploying to cloud, set runLocally = true in the above code. Create a package.json with the following contents:
{
  "name": "wake_func",
  "version": "1.0.0",
  "description": "wake on lan function",
  "main": "index.js",
  "devDependencies": {
    "express": "4.17.1",
    "body-parser": "1.19.0"
  },
  "dependencies": {
    "wake_on_lan": "1.0.0",
    "semver": "7.3.5",
  }
}
Obviously you need another device with node.js installed to run this. Run npm install to install packages, then open http://127.0.0.1 in a browser. After entering the password, your target device should wake up.
Deploy to cloud
Now for the final part, we need to deploy this code. Make sure runLocally = false so it doesn't try to spin off a server - this is handled by the cloud.
I used Google Cloud in this example, buy any other provider like AWS or Azure would work in a similar way. With Google Cloud, go to console.cloud.google.com and setup a new project.
Then, from the navigation menu go to Cloud Run and hit Write a function.
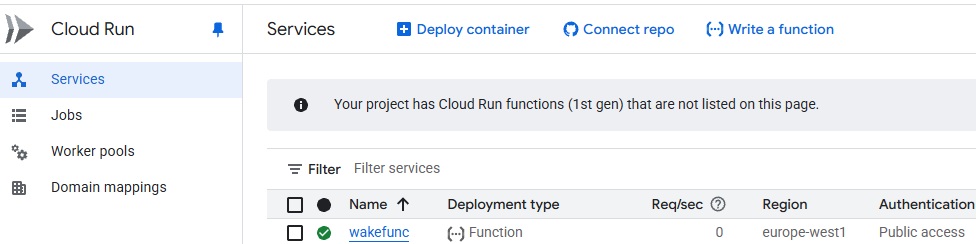
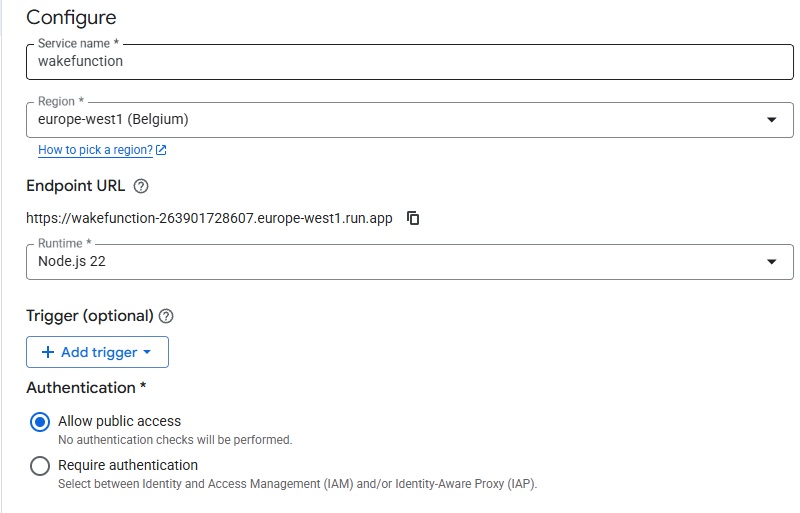
Make sure to set a Service name and select Allow public access. You can also change the region to something closer to your location. You can leave the rest of the fields to default.
In the next screen you will be presented with a code editor. Paste in our index.js and package.json we created earlier. Also, take note of the URL. Once you hit Save and redeploy your function is ready.
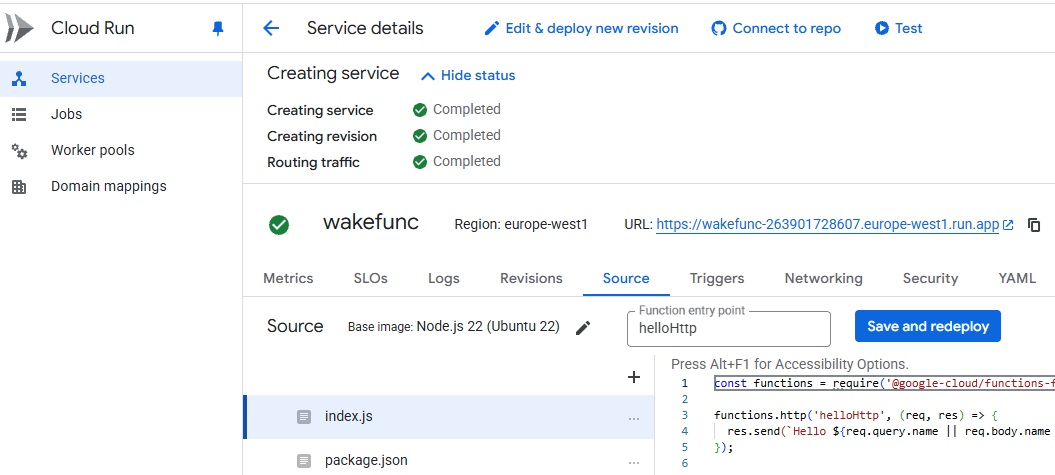
Access the URL provided by Google, enter your password and within a second or two, your target device should wake up.
Final thoughts
This may look cumbersome but once you set everything up, you have full control over how your PC is woken up. You can create a shortcut on your phone with the cloud function URL to make it super easy.
Of course, to access your PC from anywhere in the world you'd need a VPN into your home network, but that's a story for another time.
Comments
asd12138 Buy a cheap ESP8266 development board and apply for an MQTT service with a certain free quota from EMQX (or other cloud service providers). You can then use this small development board to send broadcasts within the local network (including WOL requests), paying only a few dollars for the development board. Running such a simple Arduino program consumes much fewer resources compared to running Node.js within the local network, and it's also more power-efficient.